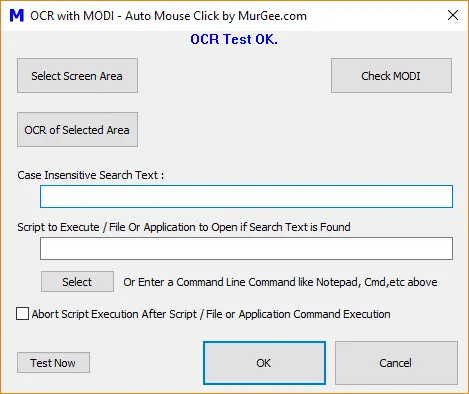
Now you can run Fast Automated OCR on the content displayed on your Screen easily and even execute a Macro Script to do Mouse Clicking, Keystroke Pressing, Launching Application or anything else. Performing Automated OCR on any defined Screen Area gives you flexibility to Monitor Screen Changes and when expected change occurs you can run a Macro Script to do anything you want. All this Screen Text Detection and running Macro Script is bundled into a small Action of a Windows Automation Software as displayed in the screenshot below.
Automated OCR to Monitor Screen Text
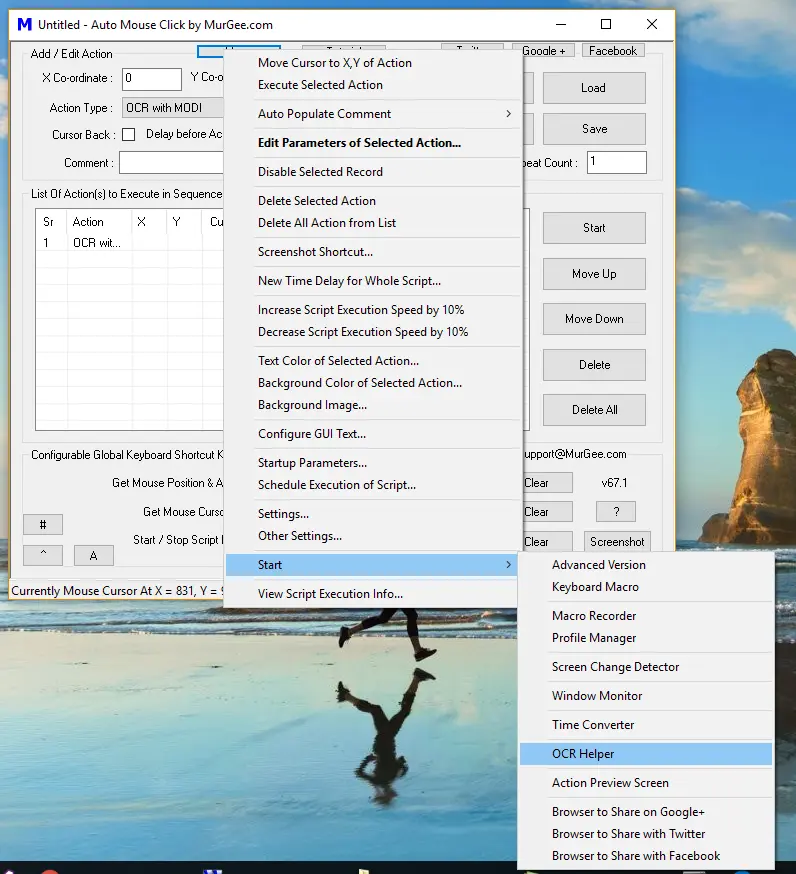
The above Screenshot displays an Action of Windows Automation Software titled Auto Mouse Click which has lots of Mouse and Keyboard Automation Actions apart from this OCR with MODI Action. In order to do Automated OCR of specified Screen Area, please follow given below steps:
Select Screen Area you want this Software to do Automated OCR and extract Text.
Specify the text you want the Macro Action to Search in the selected Area.
Specify the Macro Script / Application / Command to execute if the Search Text specified is found.
You can Optionally select the option to Abort Script Execution whenever Search Text specified is found in the Selected Screen Area. This will avoid running the execution of Macro Script/ Application / Command multiple times. You can anytime edit the Macro Parameters including Time, Repeat Count and other Parameters of Macro by following the procedure outlined in the Edit or Update an Existing Macro Action post.
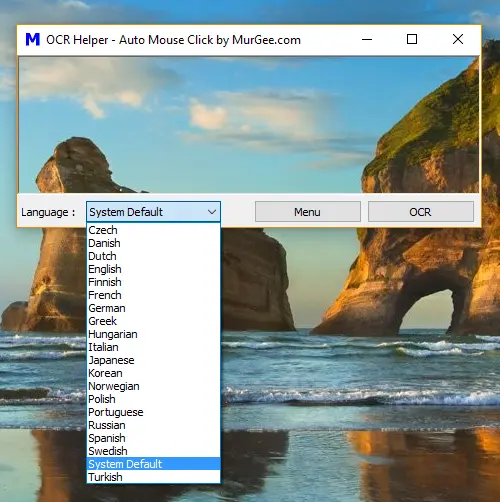
OCR Helper to Extract Text from Screen
Apart from Automated OCR Macro Action, you can use OCR Helper as displayed in the screenshot above to Extract Text from Screen Area. The OCR Helper built right into this Windows Automation Software is a small Relocatable and Re-sizable Window with Transparent Area to extract Text from any Rectangular Screen Area. Yes you can use OCR Helper to even extract Text from any Screen Image or Scanned Document file with the help of Scanner. Note that BMP, TIFF, PNG, JPEG , MODI and other Image file formats are supported.
Main Screen of OCR Helper to Extract Text from Screen
The Above Screenshot displays Main Application Window of OCR Helper with Rectangular Transparent Area to extract Text from Screen Area. Note that you can Move the Application Window to any portion of your Screen and you can even resize the OCR Helper Application Window to Extract Text from smaller or larger Screen Area.
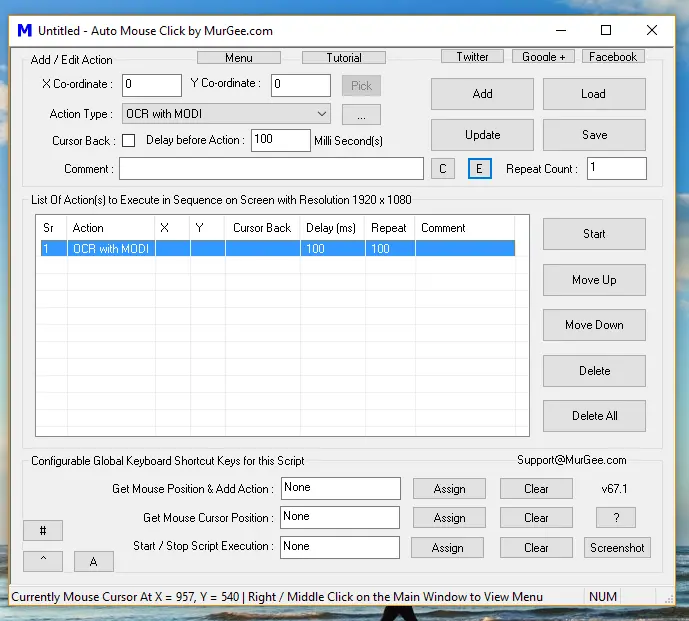
Macro Script to do Automated OCR on Screen Area
The above Screenshot displays a Macro Script with OCR Macro Action in the Script. Note that the above Screenshot has been captured on a Windows 10 Computer and the version of Auto Mouse Click is v67.1. Also note that when the Macro Script is executed with any method as outlined in How to Execute a Macro Script, the OCR Macro Action will be executed 100 times with a time delay of 100 Milli Seconds as specified in the parameters above. Yes you can edit the Macro Script parameters as per your requirements.
Monitoring any Screen Area and responding to Screen Changes (with Automated Mouse Clicks, Keystrokes or by running any Application or Command) is now really easy and quick with Automated OCR Macro Action.As the OCR is performed on your computer itself without requiring any online service, the OCR performed is really fast and it more or less depends only on your Computer and on what screen area you are doing OCR. The Accuracy of OCR depends on what you are trying to recognize. On Computer Generated Text with Standard Text Fonts, the OCR Accuracy should be pretty high and you should be able to detect Text with this OCR Macro Action easily.
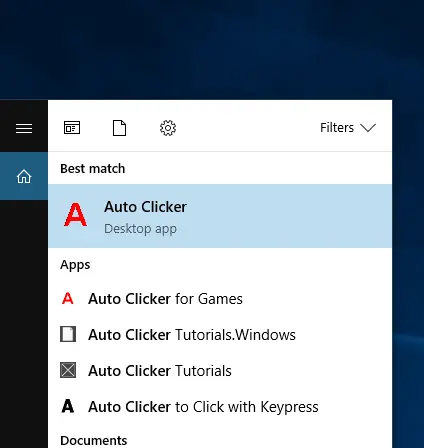
Yes you can run Auto Clicker on Windows 10 Computer as this Mouse Clicking Software is fully compatible with Windows 10. All the features of Auto Clicker works fine on Windows 10 running on 32 bit or 64 bit architectures. This post has lots of Screenshots of Auto Clicker captured on Windows 10 Computer and is treated as a Desktop App by Windows 10 in Start Menu as displayed in the Screenshot below. Yes there are lots of tutorials available as well which allows you to instantly get acquainted with the Software and start using it. The Auto Clicker is used by lots of Gamers across the Globe to get assistance in Game Play and other repetitive Mouse Clicking tasks.
Auto Clicker Desktop App on Windows 10
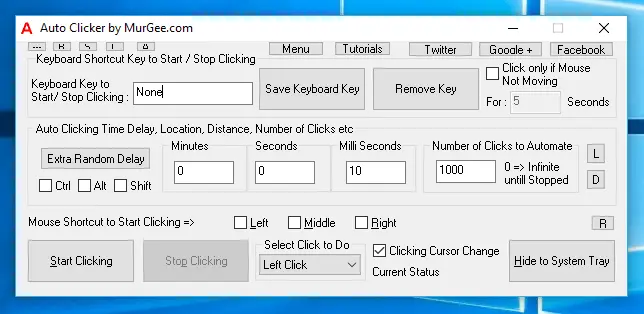
You can get Auto Clicker on a Free to Download and try basis with trial offering all the features without any limitations. All the Screenshots displayed in this post have been captured on a Windows 10 PC so that you can get an idea about the Application Appearance on Windows 10. Yes the Auto Clicker does works on other Microsoft Windows Operating Systems including Windows 11, Windows 8.1 and of-course Windows 10. The given below Screenshot displays the Main Screen of Auto Clicker offering easy access to all the functionality offered by the software.
Auto Clicker on Windows 10
Let’s pause for a little bit and examine the above Screenshot to quickly understand what all types of Mouse Clicking this nifty Desktop Application offers on Windows 10 Computers. Yes, there is too much functionality hidden somewhere on the Graphical User Interface of this Software and this post does uncovers all those features by means of Screenshot and textual content.
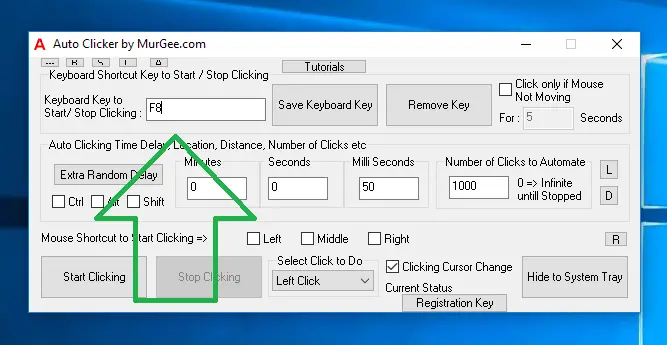
Keyboard Key to Start / Stop Clicking : A Global Keyboard Shortcut which when configured allows you to Start and Stop Automatic Mouse Clicking done by this Mouse Clicking Desktop Application. This Keyboard Shortcut or Hot Key works even when you are Playing a Game or are using another Desktop Application.
Click Only of Mouse Not Moving : This Control allows you to ensure even when you start Clicking, the Actual Mouse Clicking will start only when you have stopped Moving Mouse Cursor for pre-configured number of Seconds.
Auto Clicking Time Delay : There are 3 Text Controls which together allow you to define the time delay between consecutive Automated Mouse Clicks simulated by this Auto Clicker.
Extra Random Delay : This control allows you to add Extra Random Time Delay to above mentioned fixed time delay between consecutive Automated Mouse Clicks.
Number of Clicks to Automate : Allows you to define how many times your want your Mouse to Auto Click when started by Keyboard / Mouse Shortcut.
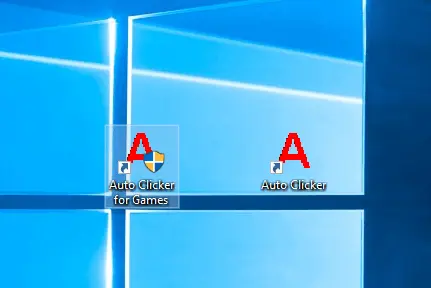
To get started, do understand all the above mentioned points and then give this Mouse Clicking Software a try on your Windows 10 Computer. Once you have downloaded and installed the software, you will get 2 Desktop Shortcuts and their purpose is as mentioned below :
Auto Clicker Desktop Shortcuts on Windows 10
Auto Clicker : This Desktop Shortcut will allow you to launch Auto Clicker with signed on privileges. You can use this Desktop Shortcut to launch Auto Clicker to Auto Click on Online Games which run in Browser window or other Applications which do not require you to provide Admin Privileges.
Auto Clicker for Games : This Desktop Shortcut also launches Auto Clicker but requires to to provide Admin Access to it so that it can send Automated Mouse Clicks to Applications / Games launched with Admin Privileges.
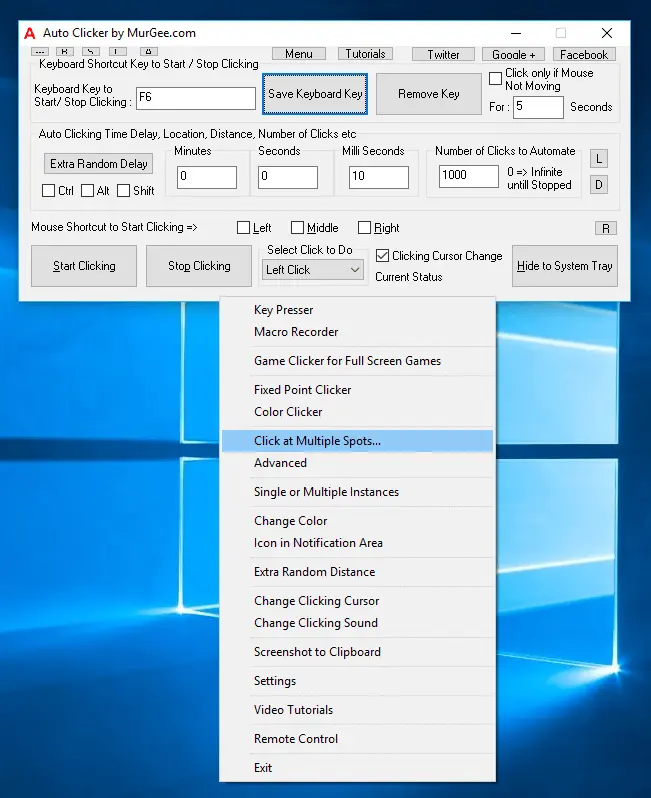
Hidden Features of Auto Clicker in Right Click Menu
As this Mouse Clicking Software has too much functionality to offer, it hides lots of functionality in Right Click menu. You can open the Right Click Menu of this Software by either Clicking on the Menu Button at the top center or you can Right Click anywhere on the Main Screen of the Software to view the Right Click Menu as displayed in the Screenshot below.
Auto Click on Multiple Screen Locations on Windows 10
The Main Screen of the Software allows you to Auto Click at current Mouse Cursor Location or at a Fixed pre-defined Screen Location or even at a Random Screen Location, however when you want to Auto Click at Multiple Screen Locations, you can use the Click at Multiple Spots Menu Item from the Right Click Menu as displayed in the Screenshot above. When using the Multiple Spot Clicker for the first time, a tutorial page opens up and provides instructions to use the Multiple Screen Location Mouse Clicking Software.
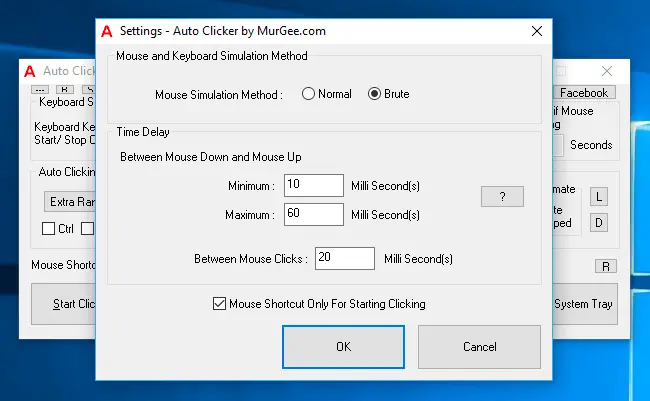
Auto Clicker Settings
Do take you time to explore the features offered in the Right Click Menu. To Name a few, you can launch Color Clicker, Fixed Point Clicker, Macro Recorder, Key Presser and Game Clicker for Full Screen Games. Apart from launching new Applications, you can even tweak the behavior of Auto Clicker by configuring it’s Settings, Change Mouse Clicking Cursor or Change Mouse Clicking Sound, etc. Windows Phone Users can even control this Auto Clicker by Enabling the Remote Control option from the Right Click Menu.
How to Launch Auto Clicker on Windows 10
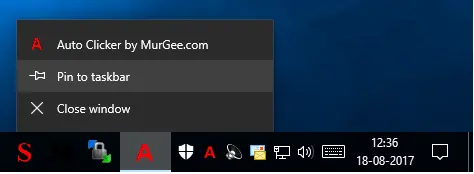
There are multiple ways in which you can launch or open Auto Clicker on your Windows 10 Computer. The easiest way to launch this very best Mouse Clicking Application is to launch it from Desktop Shortcut as mentioned earlier in this post. You can alternatively launch this Mouse Clicker from the Start Menu as displayed in the first Screenshot of this post. Another quick and easy way is to pin the Auto Clicker to taskbar on your Windows 10 Computer as displayed in the screenshot below.
Pin Auto Clicker to taskbar on Windows 10
When Auto Clicker Shortcut is pinned to taskbar, you can launch the Software by doing a left Mouse Click on the taskbar shortcut. Yes you can even drag the taskbar shortcut horizontally by using Drag and Drop. Note in the above Screenshot, you can unhide the Application’s Main Window by double clicking on the Icon in the Notification Area. You can alternatively Right Click on Notification Icon of Auto Clicker and then Click on Show MurGee Auto Clicker as displayed in the Screenshot below to view the Main Screen of the Software. Note that this Notification Icon appears only when the Application is running in Memory and is removed from the Notification Tray when the Application is Closed.
Right Click Menu on Notification Icon of Auto Clicker on Windows 10 Computer
With wide acceptance of Windows 10 by Game Developers and other Software Manufacturers, having an Auto Clicker which works fine with Windows 10 can be really helpful to Automate repetitive Mouse Clicking tasks. All the Screenshots captured above have been captured on Windows 10 Computer and the Auto Clicker has been tested extensively on Windows 10 and it works very well. Do give this Software a try to Automate your Mouse Clicking needs and Save Time, Efforts and add accuracy to your Mouse Clicking tasks.
Using Auto Clicker is really simple and easy task and this post provides step by step procedure so that you can configure Auto Clicker and learn How to Use Auto Clicker within minutes. A Short Video Tutorial is also provided in this post which displays all the Steps required in order to use the Auto Clicker. The Video Tutorial presented here is recorded on a Windows 10 Computer, however the process of using Auto Clicker is the same on all other Microsoft Windows Operating Systems. When using it for first time, read all the given below steps and understand the steps required to use Auto Clicker and then try it on your own Windows Computer.
Download Free trial of Auto Clicker and Install it on your Windows Computer by following the Setup Procedure.
Launch Auto Clicker from Shortcut Icon on Desktop or from Programs Menu.
Auto Clicker Desktop Shortcut Icons
Assign a Keyboard Shortcut in the Software with which you can Start and Stop Automatic Mouse Clicking.
Auto Clicker Keyboard Shortcut
Move Mouse Cursor to the Screen Location at which you want to Auto Click and press the Keyboard Shortcut Assigned in Step 3 above.
The Automatic Mouse Clicking will Stop Automatically after Auto Clicking the configured number of Mouse Clicks or you can Abort Automated Mouse Clicking by pressing the Keyboard Shortcut while the Automated Mouse Clicking is being performed.
As enumerated above, using Auto Clicker is really simple and easy to learn. For first time user, all the 5 steps listed above are required to use Automated Mouse Clicking, however the next time you want to use this Mouse Clicking Application, all you need to do is open the Application and use Keyboard Shortcut to Start Automated Mouse Clicking. Yes the Auto Clicker remembers all the settings including the Keyboard Shortcut Assigned. You can even launch Multiple Auto Clickers each with distinct Keyboard Shortcut and other Automated Mouse Clicking Parameters including Time Delay, Number of Automated Mouse Clicks required, Random Time Delay between consecutive Mouse Clicks , etc.
The above Video Tutorial displays How you can Use Auto Clicker on your Windows Computer. You can configure it to Click Fast or Slow depending on the purpose of your Automated Mouse Clicking Requirement. The Speed at which the Auto Clicker simulates Mouse Clicks is configurable from the Main Screen of the Software and few parameters are configurable from the Settings of the Software. Apart from using a Keyboard Shortcut, you can even use a Mouse Shortcut to Start / Stop Automated Mouse Clicking. For simplicity and to get started, follow the Steps outlined above and learn How to Use Auto Clicker and then later on, do explore the software and it’s various features on your own. This Mouse Click Automation Software is really the best Software and can Auto Click as and when required.
When you want to press a single Keyboard Key multiple times, you can use the Auto Keyboard Software which works as a Key Presser and Presses a selected Keyboard Key Multiple Times. Yes the Key Presser works in Games and other Applications and even allows you to Hold a Keyboard Key down for as long as required. Pressing a Keyboard Key few times can be done with Keyboard itself, however when you want to Automate Keyboard Key Pressing let’s say 100 times, it is best to have a Keyboard Key Pressing Software which will press the selected Keyboard Key and keeps a count automatically.
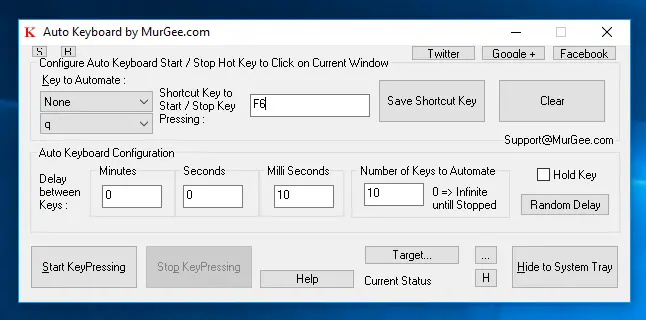
Key Presser to Press Keyboard Key Automatically
The above Screenshot displays the Key Pressing Software which has a Keyboard Shortcut Assigned and presses the Keyboard Key Q 10 times whenever F6 is pressed. Note that Key Pressing is a composite task involving 3 Actions
Press a Keyboard Key Down
Wait for some time
Release the Keyboard Key
All the above steps are done by humans whenever a Keyboard Key needs to be sent to activate Application or Game. When you need to repeat the Keyboard Key Pressing task, you need to maintain a count and do 3 steps above multiple times. The Auto Keyboard Software performs all these steps automatically saving you time and efforts and assist you in playing your Game or using any other Application which requires lots of Keystrokes. This Software is similar to Simple Mouse Clicking Software mentioned earlier in this blog which simulates Mouse Clicking. The Speed of Key Pressing is configurable by configuring the time delay between consecutive Keystroke Automation from the Main Screen by configuring Delay between Keys.
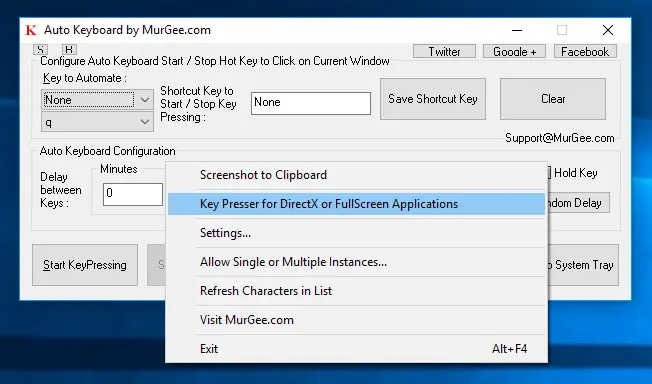
Key Presser for DirectX or Full Screen Games
Lots of Gamer across the Globe use Auto Keyboard to get assistance in Online Games, Desktop Games and even in Full Screen Games which run on Direct X or other Graphics Technologies. In Most Games, the Auto Keyboard Simply works by running the Software with Admin Access. However when your Game does not recognize the Keystrokes sent by the Auto Keyboard, you can use the Key Presser for Direct X or Full Screen Games Application bundled in the Right Click Menu as displayed in the Screenshot above. There are few extra steps required in order to configure and use and are documented at Key Presser for Games. Overall you would need a Admin Access to your Computer and rest all steps are easy and requires one time configuration only. Once you have configured the Key Presser, you can continue using it and no extra configuration is required.
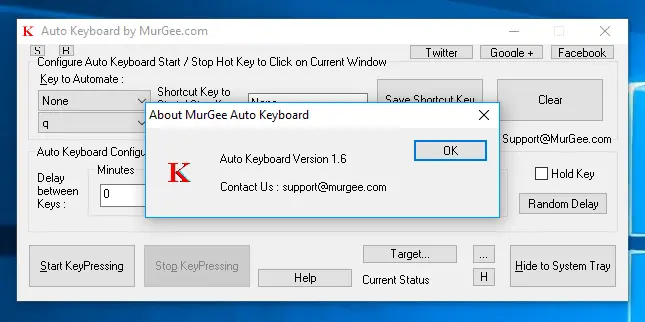
Auto Keyboard Version 1.6
The Current Version of this Key Pressing Software is Version 1.6 as displayed in the Image above. The Software displayed above is available on a Free to download and try basis and once the free trial usages have been used, you are supposed to pay $5.00 as Activation Fees. Yes, you can use this Key Pressing Application on Windows 10, Windows 8.1, Windows 7 and other Microsoft Operating Systems running on either 32 bit or 64 bit architecture. With this Simple and Easy to use Key Presser, you can Automate Keystroke Pressing in Games and other Application. The Time Delay between Keystrokes can be configured as Fixed Time Delay or a Random Time Delay to simulate Human Keystroke Pressing. Give this Keyboard Key Presser Application a try and yes it is worth it and can definitely assist you in tedious Keystroke pressing.
Yes Mouse Clicking is simple and easy to do, however when you need to click many times or with accuracy, you can use a Mouse Clicking Software like Auto Clicker to do the Mouse Clicking for you. The Auto Clicker is a Simple and Easy to use Software which allows you to Automate Mouse Clicking. The Automated Mouse Clicking is controllable with a Keyboard or Mouse Shortcut and yes, the underlying Application or Game does receives our Mouse Clicks. In the simplest form, you assign a Keyboard Shortcut to Start Automated Mouse Clicking, Press the Keyboard Shortcut and the Software starts doing Mouse Clicking for you for as long as you want.
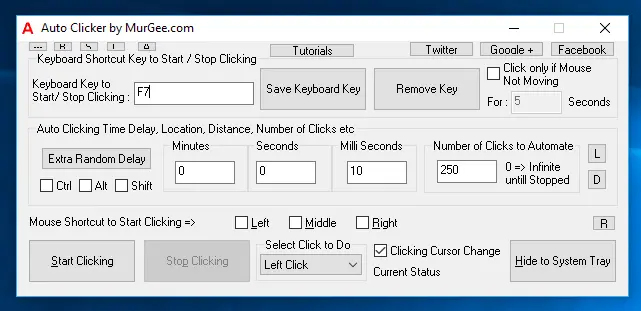
Simple Auto Clicker to do Automated Mouse Clicking
Screenshot above displays a simple and easy to use Auto Clicker which can be used in Games and to Click in other Applications which require lots of Mouse Clicking. On close inspection of above screenshot, you can easy figure out given below details
A Keyboard Shortcut F7 has been assigned to Start Automated Mouse Clicking.
Mouse Clicking will be paced at 10 Milli Second interval.
When started 250 Mouse Clicks will be automated.
During Automated Mouse Clicking, the Mouse Cursor will change to a different Mouse Cursor.
Left Mouse Click will be simulated with current configuration.
Yes, apart from above parameters there are lots of other parameters which together can give you finest control over Mouse Automation for Repetitive Mouse Clicking. Whether you want to Click really Fast with a Keyboard Shortcut, Automate Mouse Click at some fixed / random interval time duration, click at current Mouse Cursor Location or a pre-determined Fixed Screen Location, and much more can be done with this Simple Auto Clicker. It is always a good idea to start with simple things as displayed in the screenshot above and then later explore other Advanced features of this Software. Yes there are lots of tutorials available in text and in video formats which you can use to learn all about this Very Best Mouse Clicking Software.
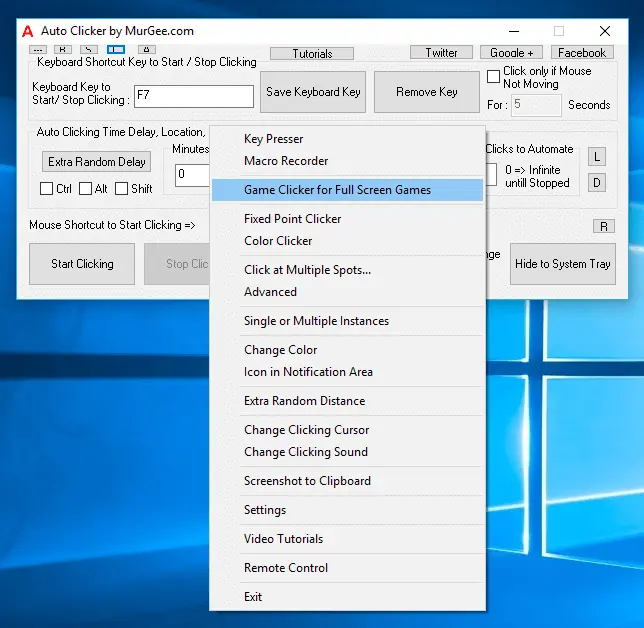
Advanced Features of Auto Clicker to Auto Click in Games and other Applications
In order to explore Advanced features of this Simple and Easy to use Auto Clicker, Move your Mouse Cursor on the Application and Right Click anywhere on the Software to view a Menu offering Advanced features of this Mouse Clicking Application. With an inbuilt Key Presser, Advanced Mouse Clicking Software and almost everything to control, this outstanding Application definitely excels your expectations. The Best thing about this Application is that you can Download and try this Application for Free and the Software is fully functional without any functionality limitations. Compatible Operating Systems for this Application are almost all Windows Operating Systems from Windows 7, Windows 8, Windows 8.1, Windows 10 and other Server Windows Operating Systems. Whether you are using a 32 bit or 64 bit Operating System, you can easily use this Mouse Clicking Application to give your fingers a rest and let this Application do the Clicking for you.
System Menu of Auto Clicker offering Software Customization and more Automated Mouse Clicking Features
Customizing Auto Clicker behavior, Appearance, etc can be done from the System Menu of the Software as displayed in the Screenshot above. You will find link to Video Tutorials, can find out the version number, configure color of the software, change Mouse Clicking Cursor and much more. Automated Mouse Clicking is really Simple and Fun when done with this Mouse Clicking Application. In the past, Gamers used Butterfly Clicking, Jitter Clicking, etc to do Fast Mouse Clicking, but all that is History now and now with this latest method of Automated Mouse Clicking, you can stop worrying about Fast Clicking or Clicking hundreds of them and instead play the Game of your Choice with full enjoyment.
Using Multiple Mouse on a Multiple Monitor Windows Computer is quick and easy. All you need to do is connect multiple Mouse / Pointing Devices to your Windows Computer and the Operating System takes care of the rest. The given below screenshot displays a Windows Computer with 2 Mice connected and both work to control a single Mouse Cursor. Using Multiple Mouse or Pointing Devices can be handy when you want to control the Windows Computer from multiple Locations or when multiple humans want to control the Computer and yes there can be other reasons as well.
Mice on a Windows Computer
The above Screenshot displays 2 Mouse connected on a Windows Computer. Since this Screenshot was taken on a Gaming Computer, both the Mice are used for Gaming purpose with one being the Logitech Optical Gaming Mouse G300 and other being the Gaming Mouse Software used for Automated Mouse Clicking. Note that there are actually 2 physical Mice connected to this Windows Computer and each is used for a different purpose.
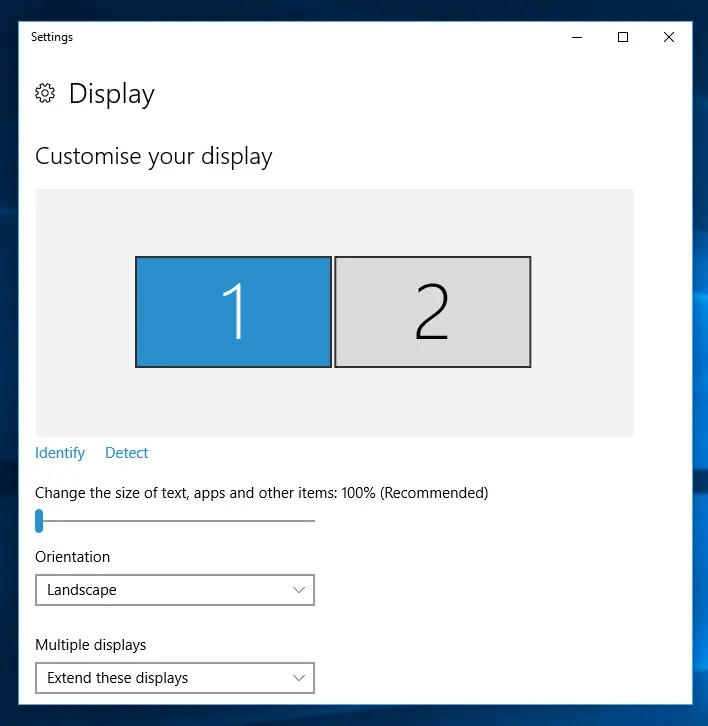
Dual Monitor Windows Computer with Extended Displays
Now looking at the Display Settings of the same Windows 10 Computer, we can see that this is a Dual Monitor Windows Computer with 2 Display Devices connected in Extended Mode. Note that the Number 1 Device is called as Primary Display Device and all other Display Devices are called as Secondary Display Devices. In Extended Mode, the actual available screen area spans across all the Display Devices. On this Computer both the Display Devices are Computer Monitors and the Second Monitor is placed to the Right of Primary or First Monitor. Moving Mouse from 1 Monitor to Second Monitor is simple task of Moving the Mouse Cursor towards Second Monitor and the Mouse Cursor jumps Monitors easily.
Mice on Multiple Monitor Windows Computer
To Summarize using Multiple Mouse or Pointing Devices on a Multiple Monitor Windows Computer is almost the same as using Mice on a Single Monitor Windows Computer with the exception that on Multiple Monitor Windows Computer, the Mouse Cursor can be moved in an adjustable direction as controlled by Monitor Position defined in Display Settings. When you want to have Multiple Mouse or Pointing Devices connected to your Single or Multiple Monitor Windows Computer, you can even consider having Wireless Mouse Controls so as to avoid the hassles of Wires connecting Mice and the Windows Computer.
Windows does allows you to configure your Mouse from the Windows Control Panel. Tweaking Mouse Properties are many times required and can be fun as well. Changing Mouse Cursor to standard Windows Cursor or switching to a Big Mouse Cursor or even an animated Mouse Cursor can be done for fun and can be really useful depending on your Display Resolution and purpose of your Computer.
Mouse Properties in Windows Control Panel
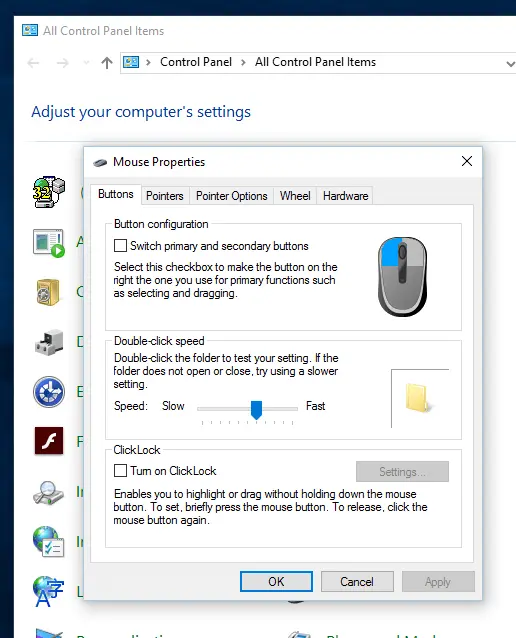
In case you are new to Windows or have Migrated to Windows from any other Operating System, please do read the post Configure Mouse Properties on Windows which outlines the procedure to launch Mouse Properties Screen and configure various parameters of Mouse. This post talks in details about various options available and give you quick access to all the configurable settings available from Mouse Properties Screen. The Screenshot above displays the Mouse Properties Screen and displays the first Tab offering Configuration of Buttons on the Mouse. Note that you can switch primary and secondary buttons depending on whether you are left handed or right handed person. The Next available configuration is to configure the Double-click speed which can be tested in the Mouse Properties Screen itself. Finally the first tab allows you to enable or disable ClickLock which allows you to highlight or drag without holding the mouse button.
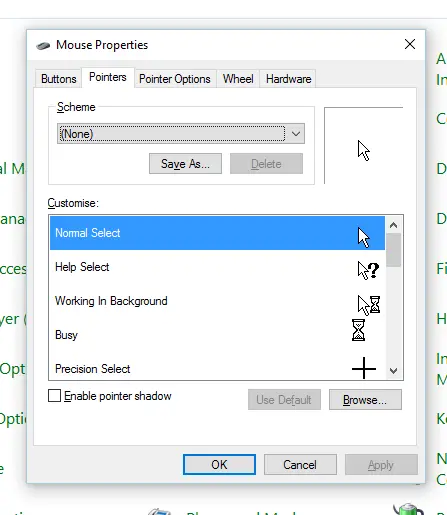
Configure Mouse Pointers from Mouse Properties
Let’s now talk about Mouse Pointers which are configurable from the second tab whose screen is as displayed above. Various Mouse Pointers are displayed during the usage of Mouse and all these Mouse Cursors are grouped into schemes. You can view current Mouse Pointer Scheme or even switch to a different Scheme. Here you can even Customize any Mouse Pointer in a Scheme by selecting a Mouse Cursor File which is basically a file with either .cur file extension or with .ani file extension.
Mouse Pointer Options in Mouse Properties
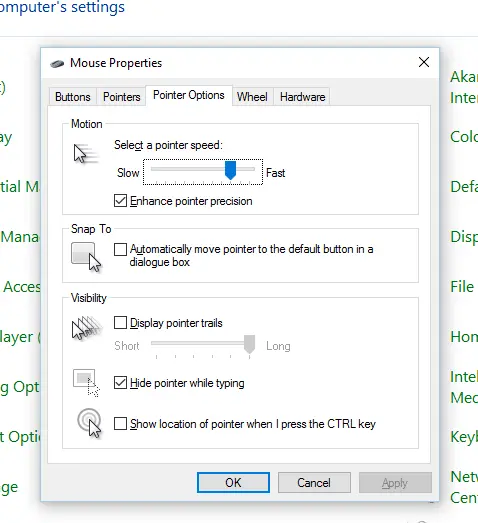
Moving onto 3rd tab of Mouse Properties which allows you to view and customize Pointer Options as displayed in the Screenshot above. As displayed above, you can select a Mouse Pointer Speed and optionally enable pointer precision. Note you can also enable the Snap To feature which automatically moves the pointer to the default button in a dialogue box. Enabling pointer trails displays Mouse Animation behind Mouse Cursor and can be handy to easily locate Mouse Pointer when you have a High Definition or Ultra High Definition Display or any other circumstance where locating Mouse Pointer is becoming difficult. You can even enable the option to Hide Mouse Pointer when typing. Finally the last Configurable Setting allow you to easily locate Mouse Pointer by pressing the CTRL Key.
Scroll Wheel Configuration from Mouse Properties
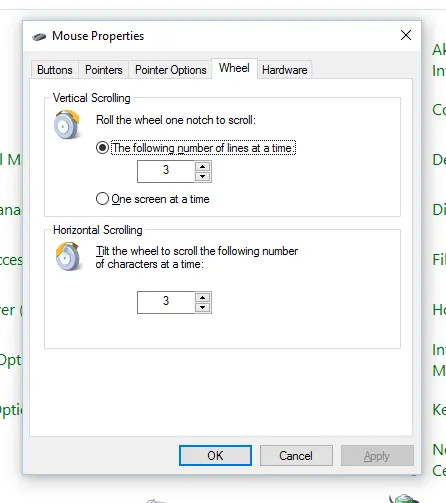
When you want to configure behavior of Scroll Wheel, you can navigate to the 4th Tab of Mouse Properties which allows you to configure Vertical and Horizontal Scrolling. Most of the Mice available now a days do have Scroll Wheel for Vertical Scrolling, however Horizontal Scrolling is sort of less popular than Vertical Scrolling. This Wheel Tab of Mouse Properties allows you to configure what happens when you Roll the wheel one notch to scroll. The available options are finite number of lines at a time or One Screen at a time. Similarly for Horizontal Scrolling, you can configure the number of characters to be scrolled when wheel is tiled.
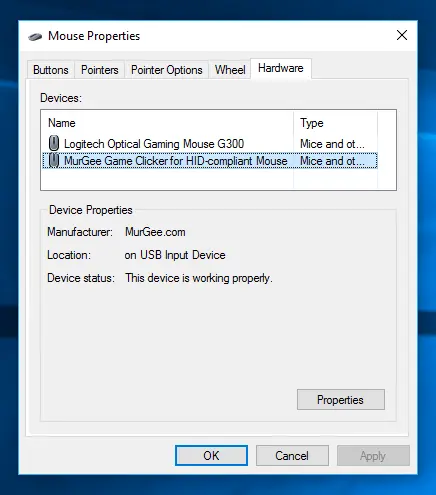
Hardware Configuration from Mouse Properties
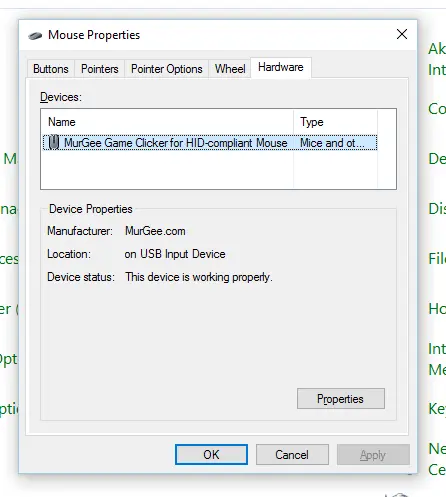
The Last Tab of Mouse Properties is a Hardware Configuration Screen which allows you to view and configure all the Mice connected to your Windows Computer. The above Screenshot displays Hardware Configuration of a Windows 10 Computer on which there is 1 Mouse Connected to a Gaming Computer. The Standard Device Drivers of the Mouse supplied by Microsoft have been updated to support Gaming Mouse Software and is being used for Gaming Purpose. Yes you can connect Multiple Physical Mouse to your Windows Computer, however Windows Supports only 1 Mouse Cursor and even with multiple Mice connected to your Windows Computer, all the Mice connected will control 1 single Mouse Cursor. Yes there are other 3rd party Software Applications available which allow you to configure Mouse Cursor(s) in other ways which are not supported by Microsoft Windows Operating System.
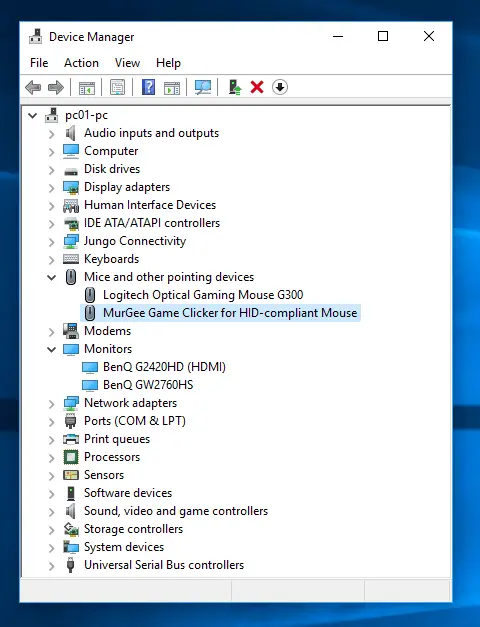
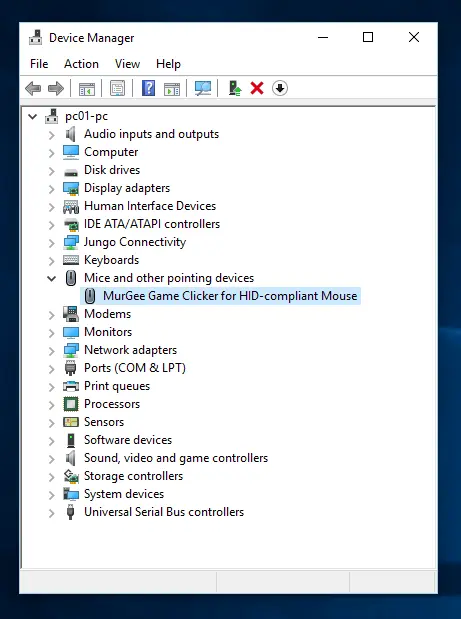
Device Manager Displaying Mice and other pointing devices
You can also locate Mice connected to your Windows Computer by looking at Device Manager. Note the above Screenshot of Windows Device Manager displays 1 Mouse displayed under the section Mice and other pointing devices. Hopefully this article was informative and useful when looking to configure appropriate Mouse Setting. Whether you are using Windows 10, Windows 8.1, Windows 11, Windows 2000 or any other Windows Operating System, the Mouse Settings Screen has remained almost the same across various version of Microsoft Windows. Before changing any Settings of your Mouse, do make sure that you do understand the effect of change and can revert back any change in Mouse Settings if required.
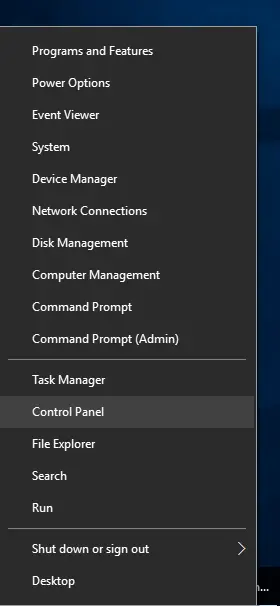
Windows Operating System allows you to configure your Physical Mouse from the Control Panel. You can control Mouse Pointer Speed, Mouse Cursor, Double Click Speed and various other properties of Mouse. There are multiple ways to launch Windows Control Panel, and given below screenshot displays a really quick shortcut to launch Control Panel. On your Primary Monitor, Move Mouse Cursor to the bottom Left Corner and Right Click to view a Shortcut Menu offering a quick way to launch Control Panel. This Menu is available on Windows 10 Computers running on 32 bit or 64 bit architecture.
Right Click on Bottom Left Corner of Primary Monitor of Windows 10 Computer
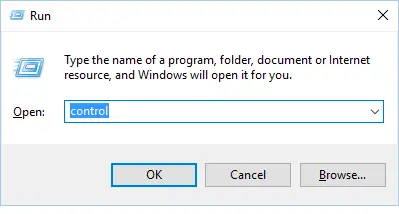
Although Windows 10 is a really popular Operating System, you can still launch Control Panel on other Windows Operating Systems from either Start Menu or from the Run Command which can be launched by pressing Windows Key + R and then type in Control and click on OK to launch Windows Control Panel. The given below Screenshot displays how you can launch Windows Control Panel from the Run Command to configure Mouse Properties or any other property of your Windows Computer.
Launch Control Panel from Run Command on Windows Computer
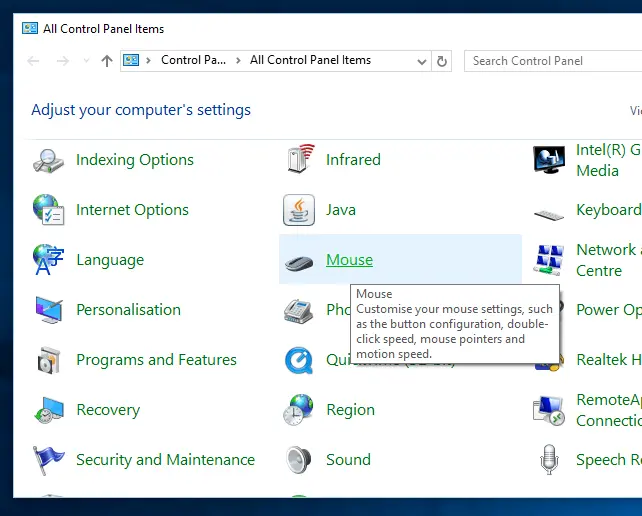
When you have successfully launched the Control Panel, locate the Mouse Icon and click on it to view Mouse Properties Screen. The given below Screenshot displays All Control Panel Items with Mouse Icon highlighted. Note the tooltip of the Mouse Icon displays informative message and allows you to Customize your mouse settings, such as button configuration, double-click speed, mouse pointers and mouse speed.
Configure Mouse on Windows with Mouse Control Panel
The Mouse Properties Screen is a tabbed screen in which you can view existing settings and change appropriate settings. This can be really useful when you have bought a new Mouse for Gaming or Installed your Windows Computer freshly or even bought a new Windows Computer. Note there are 3 buttons at the bottom of the Mouse Properties screen titled OK, Cancel and Apply. These 3 buttons Save All Settings and Close the Mouse Properties Screen, Aborts any changes and Closes Mouse Properties Screen and the Apply Button Applies the changed setting to your Mouse and does not closes the Mouse Properties Screen.
Mouse Properties in Windows Control Panel
In case your Mouse Pointer is not working altogether, you can use Keyboard Shortcuts to Open Mouse Properties and Navigate in the Mouse Properties Screen with the help of Tab Key. You can even switch between Tabbed Screen of Mouse Properties with the help of Control + Tab Key Combination. In case your Keyboard has Numeric Keypad, you can use it to Mouse your Mouse Pointer without connecting a Physical Mouse. In rare case, your Mouse Device Driver might get corrupted and uninstalling the Mouse Drivers and Installing them again, might help you in re-connecting your Mouse. Another final thought is to ensure that your USB Port on your Computer is working fine and if required connect to another USB Port or to a different Computer and verify that the Mouse is working fine.
Performing various Tasks on Computer normally does require using Mouse and Keyboard Together to provide required input to the Application / Game with which you need to interact. While Mouse does allows you to Move Mouse Pointer anywhere on Screen and does allows you to Click on any Screen Location, using Keyboard along with Keyboard can allow you to use Keyboard Shortcuts and provide Alphanumeric and other input to your Computer.
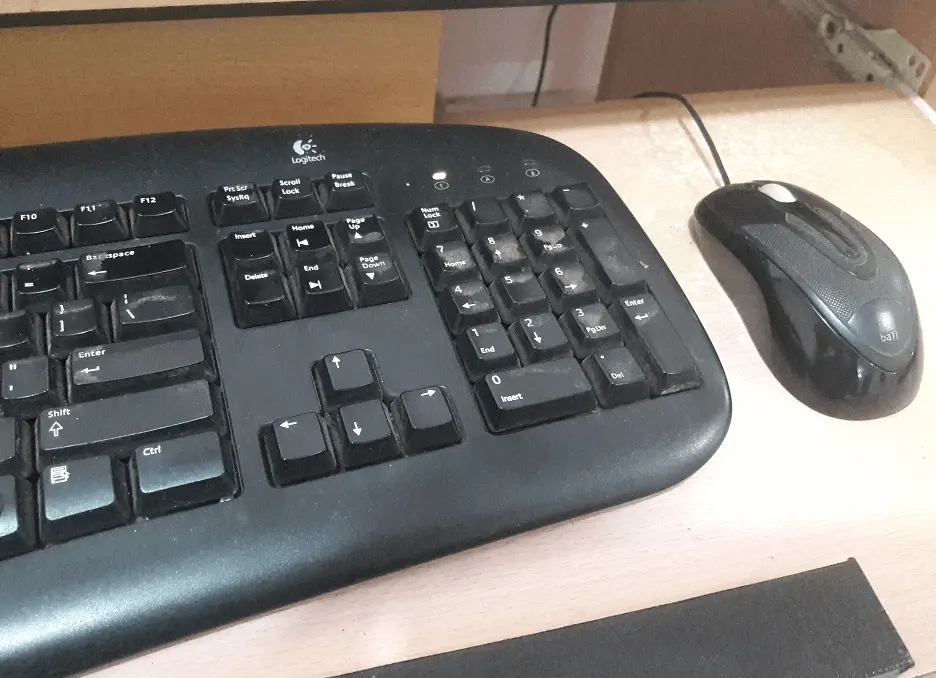
Using Mouse and Keyboard Together
In Order to effectively use Mouse and Keyboard together, arrange them both so that you can control them with both of your hands in a comfortable way. Depending on space available in your Office/ House or any other place at which you wish to use your Computer, if possible arrange a Computer Table or something like that which you can use to place your Mouse and Keyboard Devices. The Above Screenshot displays Keyboard and Mouse placed on a Computer Table with easy access to them.
What all you can do with Mouse and Keyboard ?
Depending on the Application or Game with which you are interacting, purpose and usage of your Mouse can differ. The given below example usages define commonly used actions with Mouse. Given below Actions are generic in nature and are not dependent on technology of your Mouse. Given below example Mouse Actions are applicable for Wired Mouse, Wireless Mouse, Gaming Mouse and even for Touch-pad of laptop Computers. Few Example Actions below use Keyboard together with Mouse making it easy to interact with underlying application.
Move Mouse Pointer to anywhere on your Computer Screen.
Press and Release Left or Right Mouse Button to send a Left or Right Mouse Click to the Application / Game Window which is under Mouse Cursor.
Send a Double Left or Right Click to the underlying Application / Game by quickly pressing and releasing Left / Right Mouse Button 2 times.
Control + Click can be done by using Keyboard and Mouse Together to select multiple Files / Folders in Windows Explorer. The behavior of Control + Click can be different depending on the Application being used.
Similar to Control Click, you can use Shift + Left Click to select a Range of Files / Folders in Windows Explorer and other Applications.
Use Scroll Wheel to vertically scroll through large Scrollable area. The Scroll Wheel can be really useful when the content you wish to view does not fits vertically on your Screen. A Quick example is Scrolling through content of any given Website like this one.
Drag and Drop can be done with the Mouse allowing you to reorder / move visible elements on your Screen.
Middle Mouse Click can be done by pressing the Scroll Wheel on your Mouse just like pressing Mouse Button for doing Left or Right Click.
Using Mouse and Keyboard Together does gives you lots of Combinations and provides you an efficient way to control your Computer and appropriate applications. Mouse and Keyboard both are input devices to your Computer and yes usage of Mouse and Keyboard does changes as per behavior of your Operating System and Applications / Games running on it.
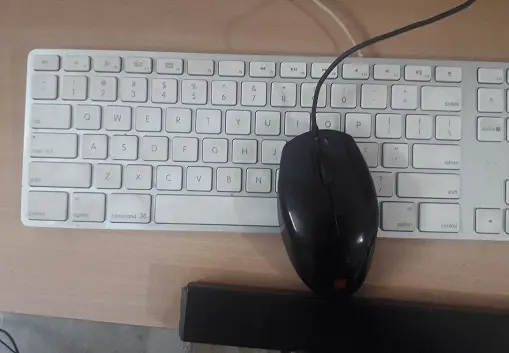
Macintosh Keyboard and Two Button Mouse
Macintosh manufacturers their own Keyboard with Flat Keys as displayed in the Screenshot above. Pressing and Releasing Keystrokes on a Macintosh Keyboard is little bit different as compared to a Windows Keyboard. Physical Size of Mouse is also Important and must be chosen wisely to ensure that it fits easily in your palm and is easily controllable. Wireless Mouse and Keyboards can also be used when you do not want hassle of wires or at at a large distance than your Computer.
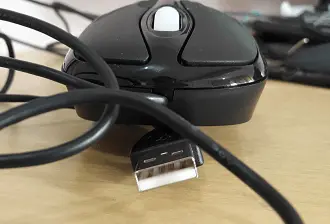
Mouse and other Electronic Devices now a days use USB (Universal Serial Bus) Connection to connect with the Computer, Mobile, Tablet or even Smart Televisions. Yes there are lots of USB Specifications in the Electronics Market. Most of the Mice available in the Market today work on USB 2.0 Specification. Yes USB 3.0 and USB 3.1 offer much faster data transfer, however Mice does not require too much data transfer and hence Mice manufactured by Electronics Manufacturers are still using USB 2.0 Specifications.
Mouse with USB 2.0 Port
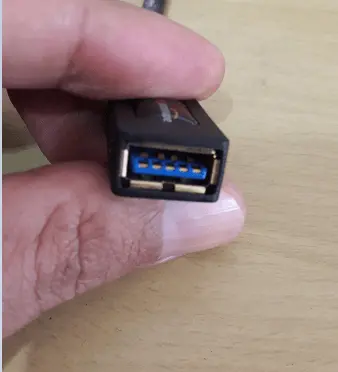
Now a days all the Computers do have USB Ports to connect other Electronic Devices. USB 2.0 Ports are rectangular sharped ports with White Colored Plastic as seen in the above screenshot. Note that the Color of Plastic inside the USB Port of White which indicates that the Mouse Displayed in the Screenshot above uses USB 2.0 Specifications. Yes even if your Computer has USB 3.0 or USB 3.1 Port, you can indeed use USB 2.0 Device on that port. The Color of Plastic inside USB 3.0 Port of Blue color as displayed in the Screenshot below.
USB 3.0 Port
The Standard USB Ports are mostly available on Desktop Computers, Laptop Computers, Mini Computers, Smart Television and on other Host Devices which can handle USB Connection to allow Mouse and other Electronic Devices Connection. When you want to connect your Mouse to Mobile or Tablet which support USB Mouse, you would need to have an adapter as displayed in the Screenshot below.
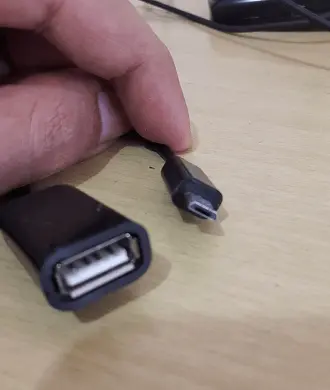
Micro USB to Standard USB Cable
The Screenshot above displays a Micro USB to Standard Cable Adapter which allows you to connect your Mouse to your Mobile Phone / Tablet which supports USB Mouse. Android does supports connection of a USB Mouse and does not require any configuration and is really easy and useful way to control Android Powered Devices like Mobile Phones, Tablets, Mini Computers , SMART TV, etc.
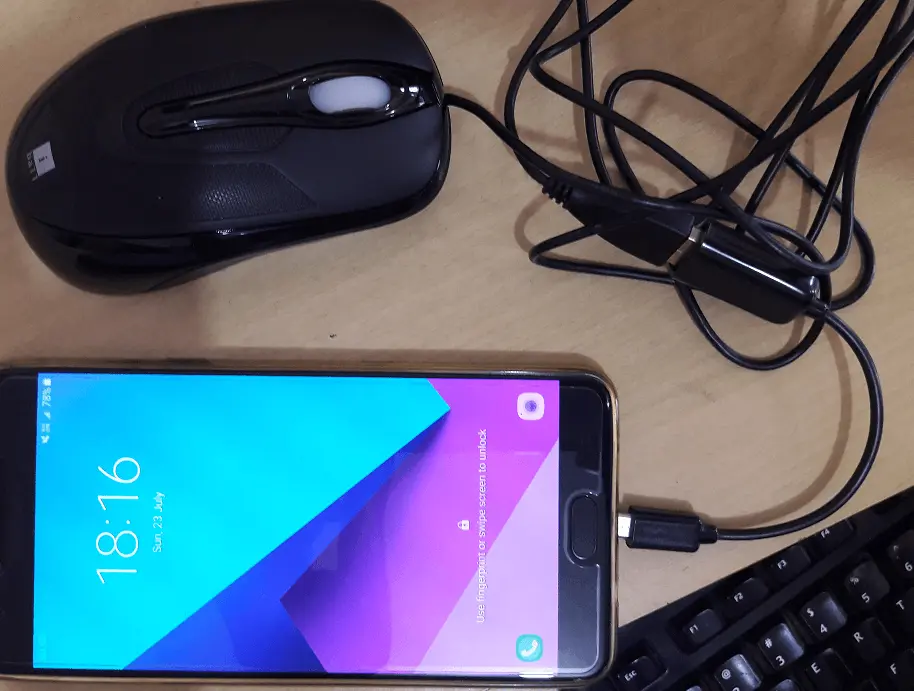
Connecting USB Mouse to Android Mobile with Micro USB to Standard USB Cable
Note in the above Screenshot that a USB Mouse with Standard USB 2.0 Port has been connected to a Micro USB to Standard USB Cable and then the Cable is connected to the Android Mobile. You can even connect a Wireless Mouse to your Android Mobile or Tablet with the help of appropriate cable / adapter. Having a Mouse Pointer to move around the Display Screen, Click anywhere you want really helps in Gaming, Navigating Around the Screen and interacting with Applications installed. Apart from connecting Mouse, you can even connect Keyboard to various Mobile Phones , Tablets and other electronic Devices.