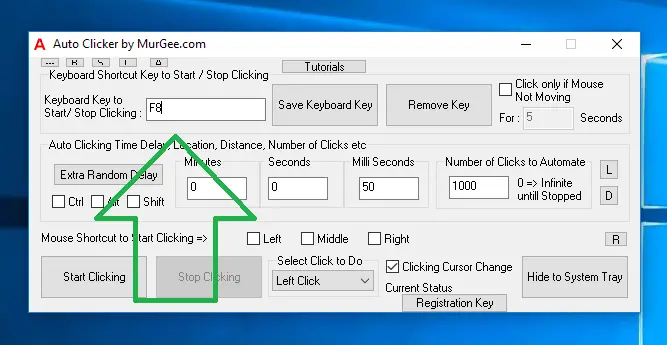
Using Auto Clicker is really simple and easy task and this post provides step by step procedure so that you can configure Auto Clicker and learn How to Use Auto Clicker within minutes. A Short Video Tutorial is also provided in this post which displays all the Steps required in order to use the Auto Clicker. The Video Tutorial presented here is recorded on a Windows 10 Computer, however the process of using Auto Clicker is the same on all other Microsoft Windows Operating Systems. When using it for first time, read all the given below steps and understand the steps required to use Auto Clicker and then try it on your own Windows Computer.
As enumerated above, using Auto Clicker is really simple and easy to learn. For first time user, all the 5 steps listed above are required to use Automated Mouse Clicking, however the next time you want to use this Mouse Clicking Application, all you need to do is open the Application and use Keyboard Shortcut to Start Automated Mouse Clicking. Yes the Auto Clicker remembers all the settings including the Keyboard Shortcut Assigned. You can even launch Multiple Auto Clickers each with distinct Keyboard Shortcut and other Automated Mouse Clicking Parameters including Time Delay, Number of Automated Mouse Clicks required, Random Time Delay between consecutive Mouse Clicks , etc.
The above Video Tutorial displays How you can Use Auto Clicker on your Windows Computer. You can configure it to Click Fast or Slow depending on the purpose of your Automated Mouse Clicking Requirement. The Speed at which the Auto Clicker simulates Mouse Clicks is configurable from the Main Screen of the Software and few parameters are configurable from the Settings of the Software. Apart from using a Keyboard Shortcut, you can even use a Mouse Shortcut to Start / Stop Automated Mouse Clicking. For simplicity and to get started, follow the Steps outlined above and learn How to Use Auto Clicker and then later on, do explore the software and it’s various features on your own. This Mouse Click Automation Software is really the best Software and can Auto Click as and when required.